Network Security in AWS: VPC and Security Groups - Part I
Network security refers to the practice of protecting computer networks from unauthorized access, attack, or damage. It involves implementing various technologies, policies, and procedures to ensure the confidentiality, integrity, and availability of network resources.
Requirement of Network Security in AWS
Today, organizations are moving their workloads to the cloud because of the benefits and efficiency of working in the cloud. An increase in usage also introduces new risks and threats. To mention, network security is one of the key factors when it comes to depicting the security posture let it be in the local or the cloud environment. As we are mainly focused on AWS, Virtual Private Cloud (VPC) and Security Groups are two important tools for securing AWS resources.
In this blog, I will be sharing the key differences between VPC and Security Groups, a guide on configuring them via AWS CLI and securing an EC2 instance applying both.
So, let's now jump to the key benefits of applying network security in AWS:
We can create an isolated network, ensuring that the resources are not directly accessible from the internet and any other VPCs unless permitted.
Using security groups and Network Access Control Lists (NACLs) we can control inbound and outbound traffic to each AWS resource.
Load balancing and DDoS protection helps by ensuring that resources are available to users protecting against disruptions caused by malicious attacks.
VPC
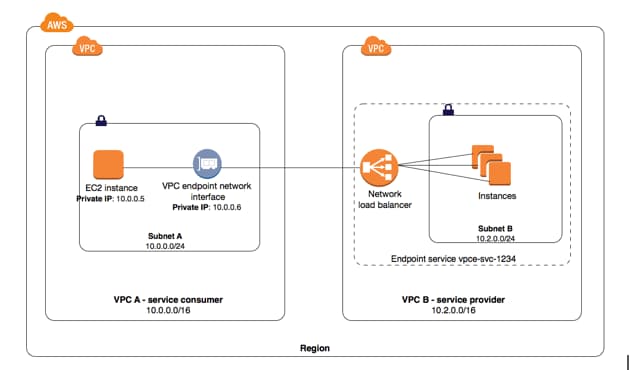
Amazon Virtual Private Cloud (VPC) is a virtual network that can be used to create and manage networks in the cloud. A VPC is similar to a physical network in many ways, despite it being created and managed in the AWS cloud. VPC differs from VLANs and subnets as VPC is a cloud-based tool used to create and manage virtual networks within the cloud, while VLANs and subnets are used to create and manage networks in physical/ on-premises environments.
Learn more on Configuring VPC and AWS Cognito to protect AWS Resources: https://blog.pradeepbhattarai.me/securing-aws-resources-with-vpc-and-cognito
Security Groups
Security Groups can be defined as the virtual firewall for the EC2 instances which mainly works for controlling inbound and outbound traffics. Security Groups allow us to specify how we can access our services based on the protocols, ports, and IP addresses. Security Groups can be changed at any time, allowing us to modify the rules in real-time.
Creating an isolated EC2 instance
In this blog, I am providing a guide on how to create an isolated EC2 instance that can only be accessed only from the VPC. I am modifying the AWS-managed AmazonEC2FullAccess policy for ec2 removing permissions for autoscaling, cloud watch, elastic load balancing, etc.
I agree the policy below does not follow the best practices of least privilege, as I am providing full access to ec2, but the same result can also be achieved with IAM user with Programmatic access with basic permissions like: ec2:CreateVpc, ec2:CreateSubnet, ec2:CreateSecurityGroup, ec2:RunInstances, ec2:AuthorizeSecurityGroupIngress, ec2:AuthorizeSecurityGroupEgress.
{
    "Version": "2012-10-17",
    "Statement": [
        {
            "Sid": "Test",
            "Effect": "Allow",
            "Action": "ec2:*",
            "Resource": "*"
        }
    ]
}
After creating a new user and setting the above policy, we can now create a VPC using AWS CLI, we can use the create-vpc command. For example, to create a VPC with a CIDR block of 192.168.1.0/24, we can run the following command:
aws ec2 create-vpc --cidr-block 192.168.1.0/24 --profile test
Output:
{
    "Vpc": {
        "CidrBlock": "192.168.1.0/24",
        "DhcpOptionsId": "dopt-<<redacted>>",
        "State": "pending",
        "VpcId": "vpc-<<redacted>>",
        "OwnerId": "<<redacted>>",
        "InstanceTenancy": "default",
        "Ipv6CidrBlockAssociationSet": [],
        "CidrBlockAssociationSet": [
            {
                "AssociationId": "vpc-cidr-assoc-<<redacted>>",
                "CidrBlock": "192.168.1.0/24",
                "CidrBlockState": {
                    "State": "associated"
                }
            }
        ],
        "IsDefault": false
    }
}
Note: I am assuming that you have already configured the profile for managing your AWS account, I am also using the --profile test for which I have already configured my profile. If not you can simply create a new profile using the aws configure --profile test. Also, a region needs to be defined for which region we are working. This can be done by appending --region <AWS Region> within the end of the command or simply configuring during aws configure.
As a new VPC has been created, now let's create a new subnet.
aws ec2 create-subnet --vpc-id <vpc-id> --cidr-block 192.168.1.0/26 --availability-zone ap-south-1a
Output:
{
    "Subnet": {
        "AvailabilityZone": "ap-south-1a",
        "AvailabilityZoneId": "aps1-az1",
        "AvailableIpAddressCount": 59,
        "CidrBlock": "192.168.1.0/26",
        "DefaultForAz": false,
        "MapPublicIpOnLaunch": false,
        "State": "available",
        "SubnetId": "subnet-<<redacted>>",
        "VpcId": "vpc-<<redacted>>",
        "OwnerId": "<<redacted>>",
        "AssignIpv6AddressOnCreation": false,
        "Ipv6CidrBlockAssociationSet": [],
        "SubnetArn": "arn:aws:ec2:ap-south-1:<<redacted>>:subnet/subnet-<<redacted>>",
        "EnableDns64": false,
        "Ipv6Native": false,
        "PrivateDnsNameOptionsOnLaunch": {
            "HostnameType": "ip-name",
            "EnableResourceNameDnsARecord": false,
            "EnableResourceNameDnsAAAARecord": false
        }
    }
}
After a new VPC and subnet have been created, we can now use the create-security-group command to create a security group. To create a Security Group named Allow-SSH_HTTP, we run the following command:
aws ec2 create-security-group --group-name Allow-SSH_HTTP --description "Security Group Allowing SSH and HTTP protocol" --vpc-id <vpc-id> --profile test
Note that we need to specify VPC ID in the above command when creating a Security Group to associate it with the VPC.
Output:
{
    "GroupId": "sg-<<redacted>>"
}
As the new security group has been created, now let's allow the inbound ports for the security group.
We can now use authorize-security-group-ingress to allow incoming traffic on ports 22, 80, and 443 only from the VPC [192.168.1.0/24].
aws ec2 authorize-security-group-ingress --group-id <security-group-id> --ip-permissions '[{"IpProtocol": "tcp", "FromPort": 22, "ToPort": 22, "IpRanges": [{"CidrIp": "192.168.1.0/24"}]}, {"IpProtocol": "tcp", "FromPort": 80, "ToPort": 80, "IpRanges": [{"CidrIp": "192.168.1.0/24"}]}, {"IpProtocol": "tcp", "FromPort": 443, "ToPort": 443, "IpRanges": [{"CidrIp": "192.168.1.0/24"}]}]' --profile test
Output:
{
    "Return": true,
    "SecurityGroupRules": [
        {
            "SecurityGroupRuleId": "sgr-<<redacted>>",
            "GroupId": "sg-<<redacted>>",
            "GroupOwnerId": "<<redacted>>",
            "IsEgress": false,
            "IpProtocol": "tcp",
            "FromPort": 22,
            "ToPort": 22,
            "CidrIpv4": "192.168.1.0/24"
        },
        {
            "SecurityGroupRuleId": "sgr-<<redacted>>",
            "GroupId": "sg-<<redacted>>",
            "GroupOwnerId": "<<redacted>>",
            "IsEgress": false,
            "IpProtocol": "tcp",
            "FromPort": 80,
            "ToPort": 80,
            "CidrIpv4": "192.168.1.0/24"
        },
        {
            "SecurityGroupRuleId": "sgr-<<redacted>>",
            "GroupId": "sg-<<redacted>>",
            "GroupOwnerId": "<<redacted>>",
            "IsEgress": false,
            "IpProtocol": "tcp",
            "FromPort": 443,
            "ToPort": 443,
            "CidrIpv4": "192.168.1.0/24"
        }
    ]
}
As we have now created a new VPC, created a new security group and allowed the incoming traffic on 22, 80 and 443, we can now create a new ec2 instance and associate the newly created security group. To create an EC2 instance (Ubuntu 22.04 LTS) applying VPC and Security Groups, we can use run-instances:
aws ec2 run-instances --image-id ami-02eb7a4783e7e9317 --count 1 --instance-type t2.micro --key-name testkey --security-group-ids <security-group-id> --subnet-id <subnet-id>
Output:
{
    "Groups": [],
    "Instances": [
        {
            "AmiLaunchIndex": 0,
            "ImageId": "ami-02eb7a4783e7e9317",
            "InstanceId": "i-<<redacted>>",
            "InstanceType": "t2.micro",
            "KeyName": "docker",
            "LaunchTime": "2023-04-04T14:06:31+00:00",
            "Monitoring": {
                "State": "disabled"
            },
            "Placement": {
                "AvailabilityZone": "ap-south-1a",
                "GroupName": "",
                "Tenancy": "default"
            },
            "PrivateDnsName": "ip-192-168-1-50.ap-south-1.compute.internal",
            "PrivateIpAddress": "192.168.1.50",
            "ProductCodes": [],
            "PublicDnsName": "",
            "State": {
                "Code": 0,
                "Name": "pending"
            },
            "StateTransitionReason": "",
            "SubnetId": "subnet-<<redacted>>",
            "VpcId": "vpc-<<redacted>>",
            "Architecture": "x86_64",
            "BlockDeviceMappings":
            [],
            "ClientToken": "<<redacted>>",
            "EbsOptimized": false,
            "EnaSupport": true,
            "Hypervisor": "xen",
            "NetworkInterfaces":
            [
                {
                    "Attachment":
                    {
                        "AttachTime": "2023-04-04T14:06:31+00:00",
                        "AttachmentId": "eni-attach-<<redacted>>",
                        "DeleteOnTermination": true,
                        "DeviceIndex": 0,
                        "Status": "attaching",
                        "NetworkCardIndex": 0
                    },
                    "Description": "",
                    "Groups":
                    [
                        {
                            "GroupName": "Allow-SSH_HTTP",
                            "GroupId": "sg-<<redacted>>"
                        }
                    ],
                    "Ipv6Addresses":
                    [],
                    "MacAddress": "<<redacted>>",
                    "NetworkInterfaceId": "eni-<<redacted>>",
                    "OwnerId": "<<redacted>>",
                    "PrivateIpAddress": "192.168.1.50",
                    "PrivateIpAddresses":
                    [
                        {
                            "Primary": true,
                            "PrivateIpAddress": "192.168.1.50"
                        }
                    ],
                    "SourceDestCheck": true,
                    "Status": "in-use",
                    "SubnetId": "subnet-<<redacted>>",
                    "VpcId": "vpc-<<redacted>>",
                    "InterfaceType": "interface"
                }
            ],
            "RootDeviceName": "/dev/sda1",
            "RootDeviceType": "ebs",
            "SecurityGroups":
            [
                {
                    "GroupName": "Allow-SSH_HTTP",
                    "GroupId": "sg-<<redacted>>"
                }
            ],
            "SourceDestCheck": true,
            "StateReason":
            {
                "Code": "pending",
                "Message": "pending"
            },
            "VirtualizationType": "hvm",
            "CpuOptions":
            {
                "CoreCount": 1,
                "ThreadsPerCore": 1
            },
            "CapacityReservationSpecification":
            {
                "CapacityReservationPreference": "open"
            },
            "MetadataOptions":
            {
                "State": "pending",
                "HttpTokens": "optional",
                "HttpPutResponseHopLimit": 1,
                "HttpEndpoint": "enabled",
                "HttpProtocolIpv6": "disabled",
                "InstanceMetadataTags": "disabled"
            },
            "EnclaveOptions":
            {
                "Enabled": false
            },
            "PrivateDnsNameOptions":
            {
                "HostnameType": "ip-name",
                "EnableResourceNameDnsARecord": false,
                "EnableResourceNameDnsAAAARecord": false
            },
            "MaintenanceOptions":
            {
                "AutoRecovery": "default"
            }
        }
    ],
    "OwnerId": "<<redacted>>",
    "ReservationId": "r-<<redacted>>"
}
Note that the --key-name is used to define the key pair for logging into the created EC2 instance. I am using the keypair named testkey that I have created. You can replace the key pair in yours. Also, the AMI may differ in which region the instance is created in.
As we do not have the public IP for the instance we can not directly SSH into the instance. Let us now create a new subnet which has public IP within the VPC so we can SSH as JumpHost.
I will be covering the use of Jump Host, ELB, CloudFront, etc. to use along with the private VPC and subnet in the next blog. Stay tuned!!!!